Tag Archives: repurpose

From scratch: Beginner’s luck

Do you like discovering a whole new area of DIY/crafts that you haven’t tried before? Sometimes I am reluctant to get sucked into a new area like that because I’m afraid of how much time and money it will take from my already busy crafting life. But this one – oh, this one is a good one and I’m glad I tried it… Curious?

I made my first mini-quilt. And loved it. Here it is:

And I feel especially self-congratulatory because I actually got to use the scraps of fabric that we already had, and didn’t have to buy new fabric (as much as I was tempted every time I visited fabric stores in our town).

Being thrifty on the fabric side allowed me a guilty pleasure of buying and enjoying some of the quilting “gadgets.” A rotary cutter, a self-healing mat, and a quilting hoop, for example, made the process of putting together this quilt a little easier.

I pinned this as an inspiration a while ago – it is a zig-zag quilt from liltulip on Etsy:

And here’s the inspiration for the quilt above (by the way, The Purl Bee is an awesome blog full of inspiration and how-tos for sewers, knitters, and crocheters):

zigzagwhole425.jpg

Because I’ve never attempted anything like this before, I expected a couple of detours and wrong turns along the way, but everything seemed to have gone very smoothly. Of course, the fun part was putting together the colorful top. It’s amazing to see the colors and the white parts coming together to form a zig-zag pattern. But when I got to hand-quilting the three layers together (the colorful top, the batting and the backing), I found the process particularly meditative. In fact, lately I’ve been finding myself attracted to rather monotonous, repetitive and painstaking processes in crafting – this coming from a usually impulsive and impatient person – who whoulda thunk?

Here’s the backing of the quilt, a cute butterfly print that I embellished with some embroidery details.

Working with the thread and needle like that reminded me of a piece of old-timey advice from a crafter and designer who never stops to uplift and inspire me:

Hold the doubled thread between your thumb and index finger, and run your fingers along it from the needle to the end of the loose tails while saying, “This thread is going to sew the most beautiful garment ever made. The person who wears this garment … will wear it in health and happiness; it will bring joy and laughter.” Continue loving  that thread, wishing it all the good that you can think of, and running it through your fingers again and again.

– Natalie Chanin, Alabama Stitch Book

I want this quilt to bring warmth and ease to the little baby who I made it for.

Leave a comment

Filed under From scratch

Renewed: Embellished laundry bag for my sister

Sometimes, I take months to formulate and execute my creative projects, only to discover that, at the end, I hate the look, the idea, or the execution, or simply the time it took to make something very simple. And sometimes, it just works – there is a raw material or a starting point, there is a perfect idea and the thing is finished in no time. And I’m happy with the results. I wonder if these things happen randomly or if I gravitate towards certain types of  creative activities that allow me to move from idea to finished product in a matter of hours or days.

Some time ago, my sister got a gift that was wrapped in a fabric tote of sorts. Brilliant blue with a yellow drawstring. Here’s what it looked like:

Took me a little while to figure out the fabric that it was made of. It’s a non-woven fabric with a velvety feel. Some stores have reusable bags made of similar fabrics and some types of fusible interfacing also feel similar. I don’t have a close-up picture, but a fellow blogger does:

From she-wears-flowers.com

And finally, eureka! The name of this glorious, low-maintenance fabric is non-woven polypropylene. How’s that for a mouthful?

The bag was a perfect size for a laundry bag, but it desperately needed ventilation. I thought about some sort of lacy, filigree design and was prepared to painstakingly cut dozens of little squares to recreate something like this. But, in the end, I found a more feminine and fluid design to draw and cut. Here’s the inspiration:

Metal Leaf Pendant from Overstock.com

Using a Sharpie, I drew the leaf outlines freehand on the inside of the bag. Then, using my manicure scissors (was it completely silly of me?), I cut out the leaves. Here is the result:

Another view:

And here’s what the finished laundry bag looks like:

What types of projects come to you quickly and are finished quickly as well? Let me know and happy crafting!

3 Comments

Filed under Renewed

Want some warmth in the winter: Nostalgic kitchen towels

Looking at kitchen designs in my my nesting magazines and blogs recently, I realized that what seems appealing in the summer and spring – the clean-lined, uncluttered counters and stainless appliances – becomes cold and overly sparse in the fall and winter. Instead, I crave a little clutter, spices, fruits and vegetables on display – and some cozy kitchen textiles.

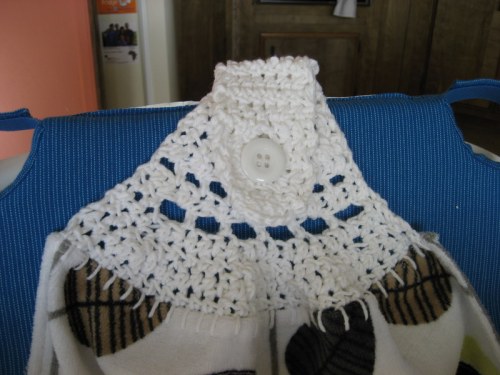
I made these cozy, nostalgic kitchen towels with crocheted toppers for Mike’s grandma when we visited her in California about a year ago. Here is one of them on the right.

They are many tutorials around the Web on how to make these towel toppers, so I decided to leave it to other talented crocheters and knitters to explain all the details.

In a  few words, here’s what I did. I bought a small towel at Target (the size of a hand towel, but not as fluffy – the towel on the picture above felt like it was microfiber), cut it in half across, and blanket-stitched the raw edge. Here is a great explanation of how to do blanket stitching. In other towel-topper tutorials, people just punch holes in the fabric with a big needle, or a nail, and crochet directly through the holes. I used the blanket stitch “loops” as a base for a row of single crochet. Then, gradually decreasing in each row as I went, I crocheted single crochet or double crochet rows. The resulting shape of the topper is like a paddle – wide at the base and tapering into a fairly narrow strip at the top. At some point, I also made a vertical buttonhole at the top of the narrow strip and finished with a rounded edge. The last step was to attach a button small enough to pass through the buttonhole easily, and – done!

Here are a couple more pictures of that towel from last year:

And here are two pictures of a twin towel from Massachusetts, scheduled to be shipped to California in a couple of days.

Of course, if I am to be completely honest, my kitchen is always filled (cluttered?) with produce, cookbooks, appliances and other stuff on display, no matter the season. But, a girl can aspire, right? What is your kitchen style? Does it change depending on the month of the year?

Leave a comment

Filed under Renewed

Wire hanger ivy topiary

Sometimes the craftiest creative ideas are also the simplest. Enter the old-fashioned and super-easy ivy topiary project.

I’ve been settling more and more into my job here and recently decided that my small office space needs to be spruced up. I cleaned up and consolidated various storage containers and uncovered a lot of empty space on and around my desk. What could be better to occupy it than plants? There is very little natural lighting in the office, but the fluorescent light should provide enough light for a non-fussy plant. Our local supermarket had small pots of ivy and I thought that it might be interesting to try growing an ivy topiary in the office.

Now I only hope that my brown thumb magically turns into a brownish-green one and the plants survive.

To make this topiary, you will need:

1. A potted ivy plant (or ivy you are going to repot, potting soil and a flower pot).

2. One or two wire hangers (the kind you can get from a dry cleaner), like this:

3. A pair of pliers or a pair of your own work-gloved hands.

4. Green heavy-duty thread or floral tape.

5. (Optional) 8 inches of steel or copper wire.

Here’s how to make the topiary:

1. Using pliers or your hands, straighten the hook part of the hanger to form a straight piece.

2. To achieve a “tulip” shape, bend/fold the horizontal bar of the hanger out, so that you get a diamond connected to the straight piece of wire that you created in Step 1.

3. Now kink each of the two sides opposite the straight piece in toward the center of the diamond.  This is very difficult to describe in words, so here’s the picture of a complete “tulip.”

4. Insert the straight piece down into the center of the pot. If the straight piece is longer than the height of your flower pot, you can cut it or bend it to the correct length.

5. (optional) Cut two 4-inch pieces of steel or copper wire and bend each in half to create a U- or V-shape. Insert one of the U-shaped wire pieces into the soil, crossing the wire hanger at a 45-degree angle. Now insert the second U-shaped wire perpendicular to the first. Contrary to what you might think, this step doesn’t require any knowledge of trigonometry – I am simply trying to support the hanger topiary structure and prevent it from falling over. A picture is worth a thousand words.

6. Take the longest branches of the ivy plant and decide which ones are going to go onto which side of the wire structure.

7. Loosely wind the branches around the corresponding side of the wire hanger, making sure to always wind in the same direction. Tie loosely with thread or floral tape in several places along the wire form (if using floral tape, carefully stretch it as you wind it around the branches to make it stick to itself).

So here you have it – the beginning of an old-fashioned ivy topiary with a modern twist. As your ivy grows, keep winding the branches around the wire structure and attaching them to it. When the branches are long enough that the two sides meet at the top, continue to wrap them in the same direction, i.e. overlapping the two sides and letting each side grow down towards the pot.

Be sure to prune your topiary regularly – you want the wire to be completely covered by the plant yet still have the “tulip” shape. When pruning, use sharp scissors and cut just where the branch meets the stem.

I am not providing any advice about caring for the plant itself, since, as I’ve already confessed, I have been known to kill even the hardiest of them. We’ll see how this one will do…

P.S. My absence from blogging is inexcusable. And while I even have some real excuses for not posting, I’ll spare you the details… Please forgive me, my dear readers – I hope you keep reading and keep crafting.

2 Comments

Filed under From scratch

Renewed: Decoupage clementine crate

or today’s tutorial, I used a very versatile and highly recyclable material available in your nearest grocery store – a clementine crate. You know the boxes made of unfinished plywood used to store the sweet tangerine-like fruit? These sturdy little boxes are wonderful and you can use them for anything from planters a la Martha Stewart to doll beds for kids.
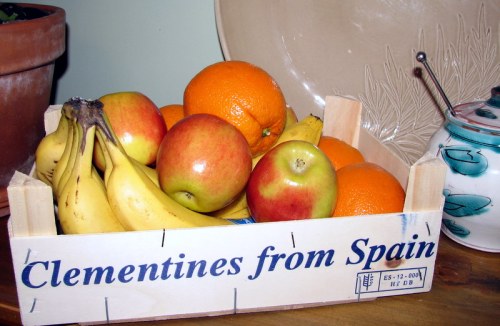
In our house, we plan on using them for mail management to separate the “FILE,” “TOSS,” and “SHRED” piles. Of course, it remains to be seen whether we actually follow through with the said organization scheme!

Have you used Clementine crates for anything other than storing clementines (or bananas and apples) themselves?

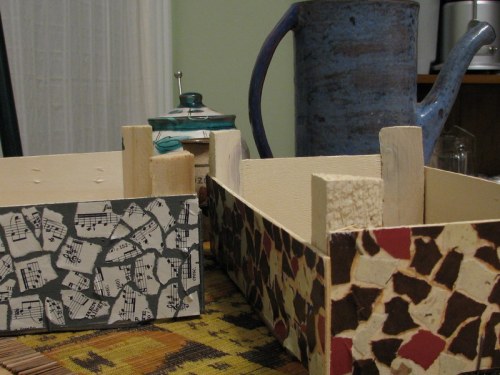
This quick DIY project transforms a clementine crate into a decorative box or tray with a decoupaged mosaic look. Here’s the “after” photo.

For this project, you will need:

1. Clementine crate (you should remove any labels, paper, and the plastic “net” that holds the clementines inside the box).

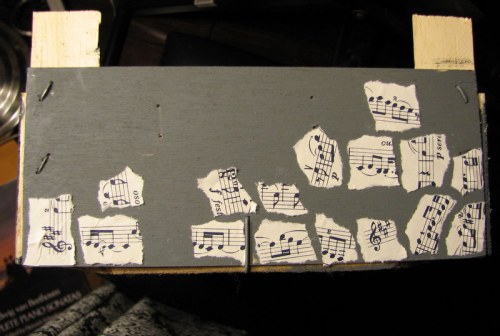
2. Wrapping or art  paper of your choosing. Even used or remnant pieces will work, as long as you have enough to cover the four sides of the crate. As you see below, I used a musical-themed giftwrap with the score of Vivaldi’s violin sonata printed on it – which Mike even tested out on the piano.

3. Acrylic paint in color contrasting with that of wrapping paper. Here I used the Ace-brand paint (from my favorite $3 sample jar) in cozy color called Flannel Suit.

4. School glue, wood glue, or Mod Podge.

5. Polyurethane for finishing.

The process:

1. Prepare the crate by painting it the base color. I didn’t find it necessary to sand the crate, since the plywood it is made of is unfinished and seems “grippy” enough for paint.  Make sure the paint is dry before step 3.

2. Tear – don’t cut – wrapping paper into 1” strips and then tear each strip into rectangles, squares, triangles – whatever shapes happen to come out as you tear.

3. Starting at the corner on each of the four sides of the crate, start gluing the pieces of paper onto the painted wood. I start with larger pieces and fill in most of the space on each side of the crate. Again, the goal is to make the mosaic to look random, so I don’t align the pieces in any way – I rotate them and shift them in relation to other pieces. Then, if there are any large gaps, I tear off a small piece of paper and fill those as well. Complete all four sides this way.

4. Finally, after letting the glue dry a bit, finish the crate with two coats of polyurethane. As you can see from the photos, I didn’t paint the corner posts grey, but I did coat them in poly to make the whole thing look finished.

On a different note, I was so happy to see all of your comments on my recycled yarn post – please keep ’em coming!

Happy crafting!

4 Comments

Filed under Renewed